Sunday, July 29, 2012

WJView Error on Start Up


Wjview lets you view window-based Java applications. A possible cause of the error message is if Wjview attempts to start an application on your system that no longer exists. To check this, perform the following steps:
1. Start Msconfig.
2. Select the Startup tab.
3. Scan the list for any entries that contain "wjview."
4. If you find any "wjview" entries, try disabling the Wjview startup
component and locate any associated folders identified in Msconfig that you
might need to delete to determine whether that solves the problem.
To delete the "wjview" entries rather than disabling them (and to check
under non-XP OSs), perform the following steps:
1. Open a registy editor (e.g., regedit.exe).
2. Navigate to the
HKEY_LOCAL_MACHINE\SOFTWARE\Microsoft\Windows\Curr entVersion\Run
and
HKEY_CURRENT_USER\Software\Microsoft\Windows\Curre ntVersion\Run registry
subkeys.
3. Remove the invalid "wjview" entries.

Note you can save the registry key first by:

On the File menu, click Export.
In the File name box, type SaveKey, and then click Save.
Or create a system restore point prior to editing.
Note: If the registry key is not there, you can simply create one by going
edit > new.

Saturday, July 28, 2012

How to Fix DLL Errors

Windows uses rundll files to load programs, files and applications. If the dll file is missing or corrupted, any application using that file cannot be loaded. This will produce a rundll error. The reason why the file has gone missing is often linked to spyware or a virus. This kind of malware often tries to hijack the files being shared by the rundll file. The other programs sharing the file then do not operate efficiently or wont load at all.
 

- Reinstall The Program

In some instances, DLL errors are a result of a problem with an individual program. Generally, you can pinpoint the program that's causing the error because when you try to use the program, the DLL error pops up.

For example, if you're receiving DLL errors every time you try to run Microsoft Word, you're almost certainly dealing with a problem with Word. Reinstall the program then head to the software manufacturer's Web site to search for program patches or updates.

Often reinstalling the program does the trick because when you reinstall the program, you're also reinstalling the DLL file.
    
-Run Your System Restore Utility

The system restore function is often a lifesaver, especially when it comes to dealing with DLL errors. Initiate a system restore, making sure the restore date is prior to when the DLL error occurred. A system restore should correct the DLL error.

Unfortunately, however, there will be times when a DLL file will make it impossible for you to get Windows running normally. Should that be the case, start your computer in safe mode then run the system restore.

-Run a System Virus Scan

If you have an anti-virus program – like Norton Anti-Virus or McAfee – run it. If you don't, get one as soon as possible , and run it on a regular basis.

Often, you can find the source of your DLL problems with a simple scan. It's common for DLL errors to occur as a result of spyware and viruses. Anti-virus programs will locate and eliminate problems, which should fix your DLL error.

 -Check For Updates & Download Them

Sometimes DLL errors occur when you install a new program. For example, you might download FrontPage and start receiving DLL errors. When that happens, head to Microsoft's Web site and look for any program updates. If there are updates, download them.

If you don't find any program updates and patches, you should uninstall the program. It's likely the DLL error will go away when you uninstall the program.

Still, you'll have to deal with the problem of not being able to run the program properly on your computer. To help solve that problem, contact the software manufacturer's technical support.
    Search Online For a Solution

Every computer user has to deal with DLL errors, so you're not alone. In fact, some computer experts recommend searching online for the answer to your DLL problems.

For example, you may be getting a DLL error telling you a particular DLL file is missing. In that case, head to your favorite search engine and search for a download of the missing DLL file.

If you're getting a WMPDXM.DLL error, go to Google and search for "WMPDXM.DLL download." Oftentimes, you'll receive dozens of hits. Choose a site then download the DLL file, and your problem should be solved.

Ultimately, while DLL errors can be annoying and time-consuming, there are numerous simple ways you can fix the problems. The key is understanding what you need to do and taking that action to ensure your computer begins to run smoothly again.

How To: Delete Un-Deletable “Access Denied” Files or Folders in Windows

Windows98/200/ME
 Many times when trying to remove an unwanted program, especially a piece of adware or spyware, you may run across a file that is undeletable by any normal method. When you try to remove it you'll receive the error message shown below telling you "access denied" and explaining the file may be in use. You may also receive one of the following messages.

-Cannot delete file: Access is denied
-There has been a sharing violation.
-The source or destination file may be in use.
-The file is in use by another program or user.
-write-protected and that the file is not currently in use
.


the easiest way to remove an undeleteable file is to boot to a DOS prompt and manually delete the file. Before you do this, you'll want to make a note of the location of the file including the entire path to it. Follow the steps below to delete these types of files.


  -Click on Start, Find, Files and Folders
  -Type the name of the undeletable file in the Named or Search For  box
   - Make sure the Look In box shows the correct drive letter
    -Click on Find Now or Search Now and let the computer find the file
    -Once the file is located, right-click on it and choose properties, make a note of the file location. Usually this is something similar to

    c:\windows\system32\undeleteablefilesname.exe

   - Close the search box
    -Locate a boot disk for your version of Windows, if you do not have a boot disk, follow the steps on the link below to create an emergency boot disk.

    How to Create an Emergency Boot Disk for Windows

    -Shut down and restart your computer with the boot disk in your floppy drive.
    -The computer will boot to a DOS prompt that will look similar to

    c:\

    Type the following command and press Enter to delete the filer, substituting the phrase <path to file> with the actual path and file name you discovered in Step 5 above.

    del <path to file>

    Example: del c:\windows\undeleteablefile.exe
   -Remove the boot disk in the floppy drive and restart your computer
   -The file should now be deleted.

Windows XP

 
In Windows XP, there are a couple ways to remove an undeleteable file, a manual way, and a couple automated ways using some freeware programs. First, I'll show you the manual way.

Manual Method

If you already know the path to the file, please skip to Step 7

    Click on Start, Search, All Files and Folders
    Type the name of the undeletable file in the box shown
    Make sure the Look In box shows the correct drive letter
    Click Search and let the computer find the file
    Once the file is located, right-click on it and choose properties, make a note of the file location. Usually this is something similar to

    c:\windows\system32\undeleteablefilesname.exe

   - Close the search box
    -Click on Start, Run, and type CMD and Press Enter to open a Command Prompt window
   - Leave the Command Prompt window open, but proceed to close all other open programs
    -Click on Start, Run and type TASKMGR.EXE and press Enter to start Task Manager

    -Click on the Processes tab, click on the process named Explorer.exe and click on End Process.
    -Minimize Task Manager but leave it open
   - Go back to the Command Prompt window and change to the directory where the file is located. To do this, use the CD command. You can follow the example below.

    Example: to change to the Windows\System32 directory you would enter the following command and Press Enter

    cd \windows\system32

    Now use the DEL command to delete the offending file. Type DEL <filename> where <filename> is the file you wish to delete.

    Example: del undeletable.exe

   - Use ALT-TAB to go back to Task Manager
    -In Task Manager, click File, New Task and enter     EXPLORER.EXE to restart the Windows shell.
    -Close Task Manager

Friday, July 27, 2012

How To Fix Rundll32.exe Errors

The reasons behind rundll errors are numerous and intriguing. Where do they come from? What are they? How do I get rid of them? These are all very good questions to ask. Unfortunately, no simple answers exist.

Rundll errors can originate from a number of sources including viruses, buggy software, spyware, or drive errors. A faulty installation, one that has not been completed or did not install properly, can also be at the root of the problem. Moreover, an uninstall of a program that has been performed incorrectly or incompletely may also be the cause of rundll errors. Additionally, undetected spyware may be responsible for the rundll errors occurring on your computer.

A rundll32 error is often caused when Windows attempts to load a file but is unable to do so. A message indicating that a rundll error has occurred usually appears on the computer screen. Whenever Windows cannot load a file because it cannot locate it, a rundll error has occurred.

In order to solve the problem, it is often necessary to go through a series of possible solutions or fixes to the problem. The first and most basic step is to do a simple reboot of your computer. If this does not seem to solve the problem, continue to the next possible fix.

If the rundll error has occurred because of a faulty uninstall, the next thing to do is to completely redo the uninstall. How do you know if this is the problem? Actually, you don't, but you can consider it, if you recently attempted to uninstall a program. To uninstall the program again, you will first need to reinstall it. Now, carefully perform a new uninstall of the program. If this solves the problem, you are in the clear. If not, continue troubleshooting.

If you have an up to date anti-spyware application, run it now. Since spyware, adware, and malware are constantly evolving into newer and more insidious versions, it is extremely important to maintain a current version. If the rundll errors continue to occur, attempt to do a clean boot
.
 
 
Complete the following steps in order to perform a clean boot on your computer.

  -  Click start to open the menu.
  -  Click run.
  -  Type 'msconfig' in the input field.
  -  Click ok. The System Configuration Utility should open.
    Once the System Configuration Utility opens, choose the selective startup option by clicking in the small circle in front of it. Deselect all but one choice listed below it. It doesn't matter which one, because you will need to do this until you have covered each one of the choices.
    -Click ok.
   - Reboot your computer.
    Once this process identifies the item that is at the root of the rundll problem, you move to the next step. Select the tab at the top of the System Configuration Utility Window that corresponds to the item that has been identified.
   - Deselect all but one of the choices below the tab.
    -Reboot your computer. If the computer reboots without any problems, continue the process of elimination. Deselect different scenarios until you identify the problem. Reboot.
    Once you identify the problematic item, you are finished with this procedure

Install Memory RAM

Install Memory RAM

This guide will take you through the process of performing a RAM upgrade.

This section refers to installing DIMM memory modules into your computer, step by step with the aid of photos.

To install your memory you will need:

    Compatible DIMM memory module/s.
    Cross-point (Philips) Screwdriver suitable for your PC case.
    Anti-Static Wrist-strap
Locating the DIMM slots
 
After removing the cover, the first thing to do is to locate the DIMM slots on your motherboard. fig. below gives you an idea of what you are looking for
Unless you are installing a new motherboard, then your slots will already have at least one dimm module installed. If this is the case, then install the new memory module into the empty slot next to the module that is already installed.

If your motherboard does not have any memory installed, then refer to your motherboard's manual for details about which slot to use.

note: Motherboards vary, although there are three slots in our example, your motherboard may have a different amount of slots
 
Install your new module(s.
  • Take your module out of its anti-static bag and hold it by the edges.
  • If you have more than one open slot, fill the lowest numbered slot first. If you can't see any numbers on your motherboard, use the slot that is closest to the filled slot(s).
  • Line up the notches in the row of gold pins at the bottom of your module with the keys in the DIMM slot on your motherboard. (If the notches don't line up right away, flip your module around and try it the other way. It doesn't matter which side of your module has the black chips or the stickers on it. The important thing is to line up the notches.)
Place memory module in DIMM slot
Press module into slot
  • Use your thumbs to press the module into the slot. Press hard! It takes about 20 pounds of pressure to get the module properly inserted in the slot. This may mean you press harder than expected — but keep the pressure on! When you hear a "click" and both side ejector clips snap up around the module, you know it is installed correctly.
Tip: Try to avoid touching the gold pins at the bottom of your module. You probably won't harm them if you do touch them, but it's better to be safe than sorry.

Installing a PC computer processor

Always make sure you ground your self before touching the processor and motherboard. If you give the processor / motherboard a static shock you could break them. There are a few different types of processors. I am going to show you how to install a Pentium 4 processor. 
Just below is a picture of a motherboard. The processor slot is located at the top centre inside where the orange square is.

All processors will only go into the slot one way, So make sure you know what way it goes in. Look at the pins on the processor and then line them up and slot the processor to the motherboard. It will be obvious which way it goes in.
Before you slot the processor in pull the metal lever up  , This will open the little slots and will alow the processor to slot in. Now slot the processor in, Make sure you do not bend any of the pins on the processor and never force it in. If you force the processor in you might risk bending the processors pins. When the processor is in place pull down the metal lever. Make sure the processor is in the slot properly and does not move. 


How To Install A Processor
All processors will get very hot when you turn on your computer, so you will need to install a heatsinker and fan to cool the processor down
 
Install A Heat sinker and Fan
  
 
the heatsink and fan is one of the most important components in the system. If this is not installed correctly your processor will frequently overheat and eventually break. So always try to buy a descent heatsink and fan. Follow the steps below to install a heatsink / Fan.

Check the processor is firmly in its slot, make sure it doesnt move from side to side. With the heat sink you should of got some compound . Wipe this compound on to the top of the processor. Have a look around the rim of the slot there will be two notches. Place the heatsink and fan on top of the processor, There will be a metal strap which will connect to the two notches, Connect one side at a time. As soon as one is done, Do the other side. (Shown below)
How To Install A Processor

When the heatsink and fan are on, gently move the heatsink left and right. If you have installed correctly it wont move much. Then finally there will be a cable coming out of the fan, Connect this to the fan power supply on your motherboard. You can use your motherboard manual to locate this
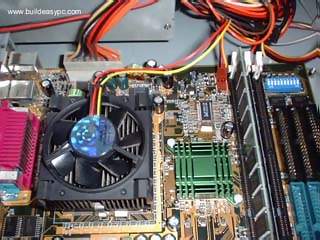

To allow the most effective conduction between the heatsink and the CPU, a thermal conducting compound is used between the CPU die and the heatsink. This is because the more contact between the die and the heatsink, the better the transfer of heat will be.
Even flat objects that appear to be in full contact might have limited points of contact, due to the roughness of the surfaces at a microscopic level. It’s estimated that only 1% of the surfaces may actually be in contact when two flat metal parts touch each another! The remaining space is filled with air, which is a poor thermal conductor. Thermal compound fills in these gaps of contact and greatly increases the efficiency of the heatsink.
Proper use of a thermal compound between the CPU and heatsink is absolutely necessary for proper cooling of the CPU. If your CPU and heatsink instructions tell you to use a thermal compound, do not omit this step.
Thermal compound comes in two forms. First is thermal grease, which looks just like any other thick liquid. If thermal grease is used, you simply place a drop of thermal grease on the die before installing the heatsink. Use a drop just about the size of a small pea and place it at the center of the die. As the heatsink is installed, it is pressed down and the thermal grease will compress and flatten out.
Second, and a better, less messy method, is a thermal tape applied to the heatsink that comes with the heatsink. Examine your heatsink and your heatsink instructions to see which method is used. If your heatsink has a strip of thermal tape on it, you don’t need to use thermal grease. The tape is used instead of the grease.
If your heatsink has a thermal tape applied to it, remove the cover of the tape just before you install the heatsink. Don’t allow the thermal tape to be exposed for a long period of time before doing the installation. You don’t want it to attract dirt.
If you ever need to remove the heatsink from the CPU, which originally had thermal tape and then reinstall the same CPU and heatsink (you probably will never need to do this), you’ll need to scrape off all of the thermal compound from the heatsink. Because the material will fill in the pores at the microscopic level, you’ll never remove all of the old material. But, try to remove all visible material. Then, you’ll apply new thermal material

How to Install a Motherboard


Introduction


Installing a motherboard seems to be very easy, but there are many tricks involved in the process. If your motherboard isn't correctly installed you will face problems like overheating and system crashes (computer "freezing", "locking", "reseting" – you name it). This tutorial is a step-by-step guide on how to correctly install your motherboard, avoiding such troubles.
Matching Holes
The motherboard is installed in the computer case. The first step is to open the case and locate the metallic plate where the motherboard is screwed to. Normally this plate can be removed from the case by unscrewing it from the back end of the case and sliding it. You must remove it from the case to install the motherboard on it. This plate has several holes, as you can see below
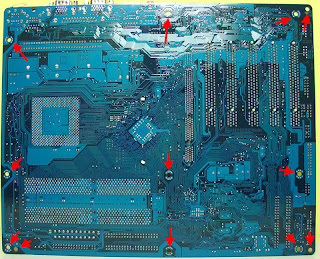
The motherboard also has several holes, as you can see below (we've drawn red arrows to point you where the holes are located). 
You should lay down the motherboard on the metallic plate and check which holes from the metallic plate match the holes on the motherboard, as we show below. As you can see by comparing  the metallic plate has more holes than needed. On the holes on the metallic plate that matched a hole on the motherboard, you will install a nut screw (more on that in a few moments). On the holes that don't match a hole on the motherboard, you will simply leave it away. Sometimes you will find some holes on the motherboard that don't match any hole on the plate. That's normal too. you can see a hole on the motherboard that doesn't match any hole on the plate

Together with the case come a lot of small pieces. From these pieces you will need screws and screw nuts to install the motherboard. For now, take the screw nuts and install them on all the plate holes that matched a hole on the motherboard. They can be easily installed by turning them clock wise using your thumb and index finger.